Crafting the Perfect Pavers Patio: A Comprehensive Guide
A pavers patio is more than just an outdoor space; it’s an extension of your home, a place for relaxation, entertainment, and creating lasting memories. The allure of a beautifully designed pavers patio lies in its durability, aesthetic appeal, and versatility. But embarking on a pavers patio project requires careful planning, meticulous execution, and a clear understanding of the process. This comprehensive guide will walk you through every step, from initial design to final sealing, ensuring you achieve a stunning and long-lasting outdoor haven. Let’s explore how to transform your backyard with a meticulously crafted pavers patio.
Planning Your Pavers Patio
Before you even think about picking up a shovel, meticulous planning is paramount. This stage sets the foundation for a successful pavers patio project.
Determine the Size and Shape
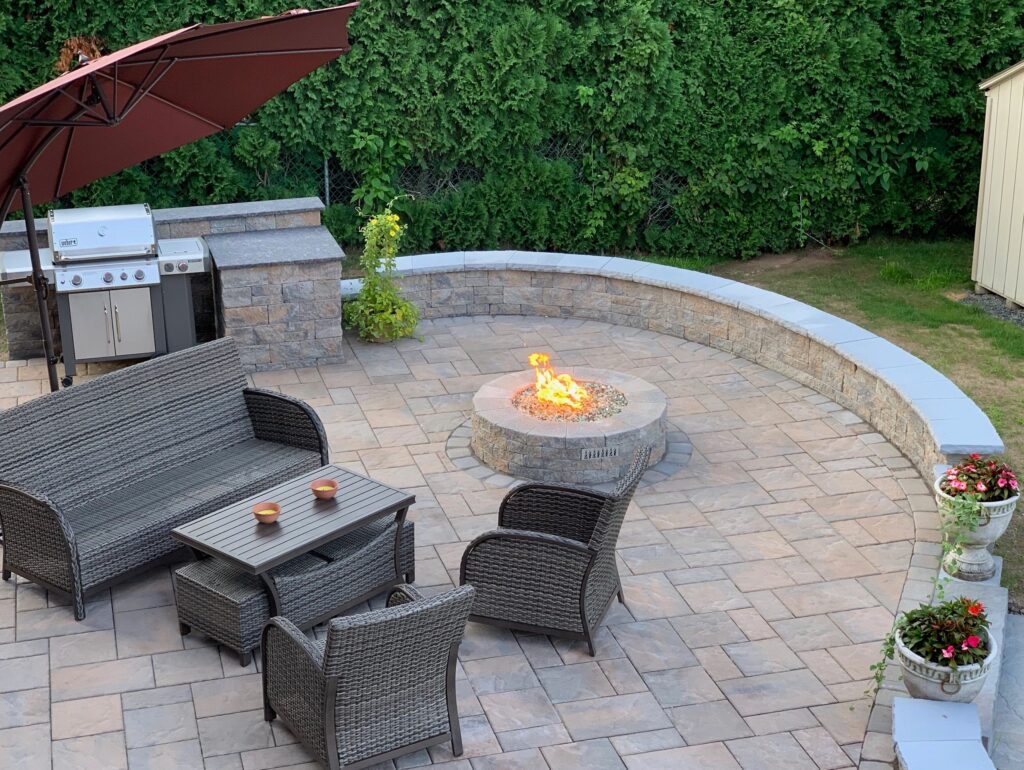
Consider the intended use of your pavers patio. Will it primarily be for dining, lounging, or entertaining? The size should comfortably accommodate your furniture and activities. Mark the area with stakes and string to visualize the space. Think about the shape – a rectangular patio is classic, but consider curves or unique angles to complement your landscape.
Choose Your Pavers
The options are endless! Concrete pavers, brick pavers, and natural stone pavers each offer distinct aesthetics and characteristics. Concrete pavers are affordable and come in a variety of colors, shapes, and textures. Brick pavers offer a timeless, rustic charm. Natural stone pavers, such as flagstone or bluestone, provide a unique and organic look. Consider the overall style of your home and landscape when making your selection. Don’t forget to factor in the paver’s thickness, as this affects its durability and suitability for heavy use. Visit local suppliers to see and feel the different options. Take samples home to see how they look in your space under different lighting conditions.
Consider Drainage
Proper drainage is crucial to prevent water from pooling on your pavers patio and causing damage. Ensure the patio slopes slightly away from your house (about 1/8 inch per foot). You may also need to install a drainage system, such as a French drain, especially in areas with poor soil drainage. Poor drainage can lead to paver shifting, weed growth, and even structural damage to your home’s foundation.
Obtain Necessary Permits
Check with your local building department to determine if any permits are required for your pavers patio project. Regulations vary depending on your location and the size of the patio. Obtaining the necessary permits ensures your project complies with local codes and avoids potential fines or delays.
Preparing the Site
Proper site preparation is critical for the longevity and stability of your pavers patio. A poorly prepared base will lead to settling, uneven pavers, and costly repairs down the road.
Excavation
Excavate the area to the appropriate depth, typically 6-8 inches. This depth includes the base material (gravel and sand) and the thickness of the pavers. Remove any topsoil, grass, roots, and debris. Use a level to ensure the excavation is uniform and consistent. Renting a sod cutter can make removing grass much easier and faster.
Base Material
The base material provides a stable foundation for your pavers. Start with a layer of compacted gravel, typically 4-6 inches thick. Use a plate compactor to compact the gravel in layers, ensuring each layer is thoroughly compacted before adding the next. This creates a solid and level surface. Next, add a layer of sand, about 1-2 inches thick. This layer provides a smooth and even surface for the pavers to rest on. Screed the sand to create a perfectly level surface. Use pipes or boards as guides to ensure a consistent depth. Remember, a well-compacted base is the key to a long-lasting pavers patio.
Geotextile Fabric
Consider using geotextile fabric between the soil and the gravel base. This fabric helps prevent soil from mixing with the gravel, which can compromise the base’s stability and drainage. It also helps prevent weed growth from below. Overlap the edges of the fabric to ensure complete coverage.
Installing the Pavers
This is where your vision starts to take shape. Careful installation ensures a professional and aesthetically pleasing result for your pavers patio.
Laying the Pavers
Start laying the pavers along one edge of the patio, working your way across. Use a string line as a guide to ensure straight lines. Gently tap each paver into place with a rubber mallet. Maintain consistent spacing between the pavers (typically 1/8 to 1/4 inch). Use paver spacers to ensure uniform gaps. Check the level frequently and make adjustments as needed. If you’re using a pattern, carefully follow your design. Cutting pavers may be necessary to fit around edges or corners. Use a paver saw or a brick chisel and hammer for clean cuts. Remember to wear safety glasses and gloves when cutting pavers.
Cutting Pavers
For intricate cuts, a wet saw is highly recommended. This tool provides clean, precise cuts and minimizes dust. If using a chisel and hammer, score the paver along the cut line before striking it firmly. Always wear safety glasses when cutting pavers to protect your eyes from flying debris.
Edge Restraints
Edge restraints are crucial for preventing the pavers from shifting and spreading over time. Install edge restraints along the perimeter of the patio, securing them to the ground with stakes or spikes. Edge restraints can be made of plastic, metal, or concrete. Choose a material that complements the style of your patio. Make sure the edge restraints are flush with the top of the pavers.
Finishing Touches
The final steps are just as important as the initial planning. These finishing touches will enhance the appearance and longevity of your pavers patio.
Joint Sand
Fill the gaps between the pavers with joint sand. This sand helps lock the pavers together and prevents weed growth. Use a broom to sweep the sand into the joints. Compact the sand by running a plate compactor over the patio. Add more sand as needed to fill any gaps that appear. Consider using polymeric sand, which hardens when wet and provides even greater weed control and joint stabilization. [See also: Choosing the Right Paver Sand for Your Project]
Sealing the Pavers
Sealing your pavers is optional, but it can protect them from staining, fading, and weathering. A sealer also enhances the color of the pavers and makes them easier to clean. Choose a sealer specifically designed for pavers. Follow the manufacturer’s instructions carefully. Apply the sealer with a roller or sprayer. Allow the sealer to dry completely before using the patio. Sealing your pavers patio will significantly extend its lifespan and maintain its beauty.
Maintenance
Regular maintenance will keep your pavers patio looking its best for years to come. Sweep the patio regularly to remove dirt and debris. Rinse the patio with a garden hose to remove stains. Use a paver cleaner to remove stubborn stains. Reapply joint sand as needed. Inspect the patio for any signs of settling or damage and make repairs promptly. [See also: Common Paver Patio Problems and How to Fix Them] Properly maintained pavers patio can last for decades, providing a beautiful and functional outdoor space for you and your family to enjoy. Consider pressure washing your patio annually to remove algae and moss.
Choosing the Right Pavers for Your Project
Selecting the right pavers is a critical decision that impacts both the aesthetic appeal and the longevity of your pavers patio. Several factors should influence your choice, including material, color, size, and texture. Concrete pavers are a popular choice due to their affordability and versatility, offering a wide range of styles to match any design. Brick pavers provide a classic, timeless look, while natural stone pavers offer unique, organic beauty. Consider the overall style of your home and landscape when making your selection. Think about the traffic your patio will endure; thicker pavers are better suited for high-traffic areas. Explore different patterns and layouts to create a visually appealing and functional space. A well-chosen paver can dramatically enhance the overall look and feel of your outdoor living area.
The Cost of a Pavers Patio
The cost of building a pavers patio can vary significantly depending on several factors, including the size of the patio, the type of pavers used, and whether you hire a professional contractor or DIY the project. Materials can range from a few dollars per square foot for basic concrete pavers to upwards of $10 per square foot for natural stone. Labor costs can add significantly to the overall expense, especially if you choose a complex design or require extensive site preparation. Consider getting multiple quotes from different contractors to compare pricing and services. Doing some of the work yourself, such as excavation or base preparation, can help reduce costs. Remember to factor in the cost of tools, equipment rentals, and any necessary permits. A well-budgeted pavers patio project can provide a valuable return on investment, enhancing your property value and providing years of enjoyment.
DIY vs. Hiring a Professional
Deciding whether to DIY your pavers patio or hire a professional contractor is a crucial decision. A DIY project can save you money on labor costs, but it requires significant time, effort, and skill. If you have experience with landscaping and construction, and are comfortable operating power tools, a DIY project may be feasible. However, if you lack experience or are short on time, hiring a professional contractor is often the best option. A professional contractor can ensure the project is completed correctly, on time, and within budget. They also have the expertise to handle any unexpected challenges that may arise. When choosing a contractor, be sure to check their references, review their portfolio, and obtain a written contract outlining the scope of work, payment schedule, and warranty. [See also: How to Find a Reliable Paver Installation Contractor] Weigh the pros and cons carefully before making your decision.
Conclusion
A well-designed and properly installed pavers patio can transform your outdoor living space, providing a beautiful and functional area for relaxation and entertainment. By following the steps outlined in this comprehensive guide, you can create a pavers patio that will last for years to come. Remember to plan carefully, prepare the site thoroughly, install the pavers meticulously, and maintain the patio regularly. Whether you choose to DIY the project or hire a professional contractor, a pavers patio is a worthwhile investment that will enhance your property value and provide endless enjoyment. So, start planning your dream pavers patio today!
