How to Build a Wood Patio: A Comprehensive Guide
Adding a wood patio to your outdoor space can significantly enhance its appeal and functionality. A well-constructed wood patio provides a perfect spot for relaxation, entertainment, and enjoying the outdoors. This comprehensive guide will walk you through the process of how to build a wood patio, from planning and preparation to construction and finishing. Whether you’re a seasoned DIY enthusiast or a beginner, this step-by-step guide will provide the knowledge and confidence you need to successfully create your own wood patio. Let’s delve into the details and explore how to build a wood patio.
Planning and Preparation
Before you even think about picking up a hammer, meticulous planning is essential. This stage sets the foundation for a successful project. Consider the following aspects:
Location, Location, Location
Choosing the right location is paramount. Consider factors such as sunlight exposure, proximity to your house, and the overall landscape. A sunny spot might be ideal for sunbathing, while a shaded area could be perfect for relaxing on hot days. Also, check for any underground utilities before you start digging. Consult local building codes and regulations to ensure your patio complies with all requirements.
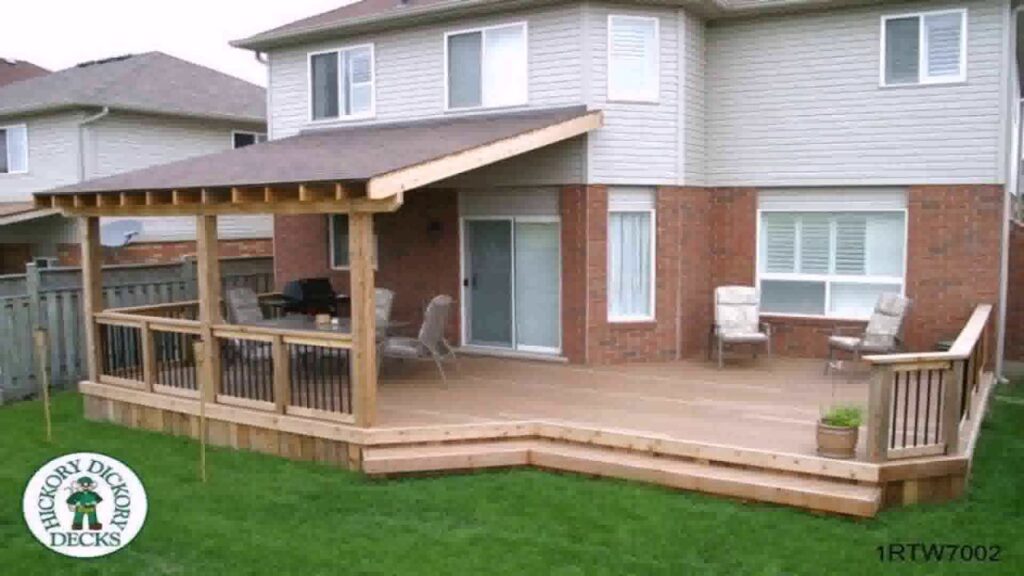
Design and Size
Sketch out a design that complements your home’s architecture and meets your needs. Think about the size of the patio and how you intend to use it. Will it primarily be for dining, lounging, or entertaining? Determine the dimensions based on your intended use and the available space. Consider the placement of furniture, such as tables, chairs, and grills, when planning the layout.
Materials Selection
Choosing the right wood is crucial for the longevity and aesthetics of your patio. Pressure-treated lumber is a popular choice due to its resistance to rot, insects, and decay. Other options include cedar, redwood, and composite decking materials. Consider the cost, durability, and maintenance requirements of each material before making a decision. Also, factor in the type of fasteners you’ll need, such as screws and nails, and ensure they are suitable for outdoor use.
Tools and Equipment
Having the right tools and equipment will make the construction process smoother and more efficient. Here’s a list of essential items:
- Measuring tape
- Shovels
- Levels (spirit level, laser level)
- Circular saw
- Drill/driver
- Hammer
- Safety glasses
- Work gloves
- Wheelbarrow (optional, but helpful for moving materials)
- Post hole digger (if setting posts)
- String line and stakes
Step-by-Step Construction Guide
Now, let’s dive into the practical steps of how to build a wood patio:
Preparing the Site
Start by clearing the area of any vegetation, rocks, and debris. Excavate the soil to a depth of about 6-8 inches. This will allow for a gravel base, which provides drainage and stability. Compact the soil using a hand tamper or plate compactor. This step is crucial to prevent settling and ensure a level surface.
Building the Frame
Construct a rectangular frame using pressure-treated lumber. The frame will serve as the foundation for your patio. Ensure the frame is level and square. Use corner brackets to reinforce the joints. If your patio is large, consider adding interior supports to prevent sagging. Secure the frame to the ground using stakes or concrete footings, depending on your design.
Adding the Gravel Base
Pour gravel into the excavated area, spreading it evenly to a depth of about 4-6 inches. Use a rake to level the gravel and then compact it thoroughly. A well-compacted gravel base is essential for proper drainage and preventing weed growth. It also provides a stable surface for the decking.
Installing the Decking
Lay the decking boards onto the frame, spacing them evenly. Use spacers to maintain consistent gaps between the boards, allowing for expansion and contraction. Secure the boards to the frame using deck screws. Consider using hidden fastener systems for a cleaner, more professional look. Ensure the screws are driven flush with the surface of the boards to prevent tripping hazards.
Finishing Touches
Once the decking is installed, it’s time to add the finishing touches. Sand any rough edges or splinters. Apply a sealant or stain to protect the wood from the elements and enhance its appearance. Consider adding railings, steps, or other decorative elements to personalize your patio. [See also: Deck Railing Ideas for a Modern Look] Add outdoor furniture, planters, and lighting to create a welcoming and functional outdoor space.
Maintenance and Care
Regular maintenance is essential to prolong the life of your wood patio. Here are some tips:
- Clean the patio regularly with a broom or hose to remove dirt and debris.
- Apply a wood cleaner and brightener to remove stains and mildew.
- Inspect the patio for signs of rot or insect damage and address any issues promptly.
- Reapply sealant or stain every 1-2 years to protect the wood from the elements.
- Consider using a pressure washer to remove stubborn stains, but be careful not to damage the wood.
Cost Considerations
The cost of building a wood patio can vary depending on several factors, including the size of the patio, the type of wood used, and whether you hire a professional contractor. Here’s a breakdown of potential costs:
- Lumber: $5-$15 per linear foot
- Fasteners: $50-$100
- Gravel: $50-$200 per cubic yard
- Sealant/stain: $30-$50 per gallon
- Tools and equipment: Varies depending on what you already own
- Labor (if hiring a contractor): $5-$15 per square foot
Doing the work yourself can save you a significant amount of money. However, if you’re not comfortable with carpentry or construction, hiring a professional contractor may be a better option. Get multiple quotes and compare prices before making a decision.
Safety Precautions
Safety should always be a top priority when undertaking any DIY project. Here are some safety precautions to keep in mind when how to build a wood patio:
- Wear safety glasses to protect your eyes from flying debris.
- Use work gloves to protect your hands from splinters and abrasions.
- Wear appropriate footwear to prevent slips and falls.
- Use power tools safely and follow the manufacturer’s instructions.
- Be aware of your surroundings and watch out for tripping hazards.
- If working at heights, use a ladder safely and have someone spot you.
- Take breaks to avoid fatigue and prevent accidents.
Alternative Patio Materials
While wood is a popular choice for patios, there are other materials to consider. Here are a few alternatives:
- Concrete: Durable and low-maintenance, but can be less aesthetically pleasing than wood.
- Pavers: Versatile and come in a variety of shapes, sizes, and colors.
- Stone: Natural and adds a rustic charm to your outdoor space.
- Composite decking: Low-maintenance and resistant to rot and insects, but can be more expensive than wood.
Each material has its own advantages and disadvantages. Consider your budget, aesthetic preferences, and maintenance requirements when making a decision.
Conclusion
Building a wood patio is a rewarding project that can add value and enjoyment to your home. By following this comprehensive guide, you can confidently tackle the project and create a beautiful and functional outdoor space. Remember to plan carefully, choose the right materials, and prioritize safety. With a little effort and attention to detail, you can transform your backyard into a relaxing oasis. Now that you know how to build a wood patio, get started and enjoy the process!
Understanding how to build a wood patio also involves knowing when to seek professional help. If you are unsure about any aspect of the project, consult with a qualified contractor. They can provide valuable advice and ensure that your patio is built safely and correctly. Happy building!
Finally, consider the environmental impact of your project. Choose sustainably sourced wood and dispose of waste materials responsibly. By making eco-friendly choices, you can enjoy your new patio while minimizing your impact on the planet. Learning how to build a wood patio responsibly is part of the process.
