Resurfacing Concrete Patio: A Comprehensive Guide to Revitalizing Your Outdoor Space
A concrete patio, once a pristine haven for outdoor relaxation and entertainment, can gradually succumb to the wear and tear of weather, foot traffic, and time. Cracks, discoloration, and general degradation can diminish its appeal, transforming a welcoming space into an eyesore. Fortunately, you don’t necessarily need to tear up and replace the entire patio. Resurfacing concrete patio is a cost-effective and efficient solution to breathe new life into your outdoor living area, restoring its beauty and functionality. This comprehensive guide will walk you through everything you need to know about resurfacing concrete patio, from assessing the damage to choosing the right materials and techniques, ensuring a successful and long-lasting transformation.
Why Choose to Resurface Your Concrete Patio?
Before diving into the how-to, let’s explore the compelling reasons to opt for resurfacing concrete patio over a complete replacement:
- Cost-Effectiveness: Resurfacing is significantly cheaper than tearing out and replacing an existing concrete slab. The savings on labor and materials can be substantial.
- Reduced Downtime: The resurfacing process is typically faster than a complete replacement, minimizing disruption to your outdoor space. You can often enjoy your revitalized patio within a matter of days, rather than weeks.
- Environmental Friendliness: Resurfacing avoids the disposal of old concrete, reducing landfill waste and the environmental impact associated with new concrete production.
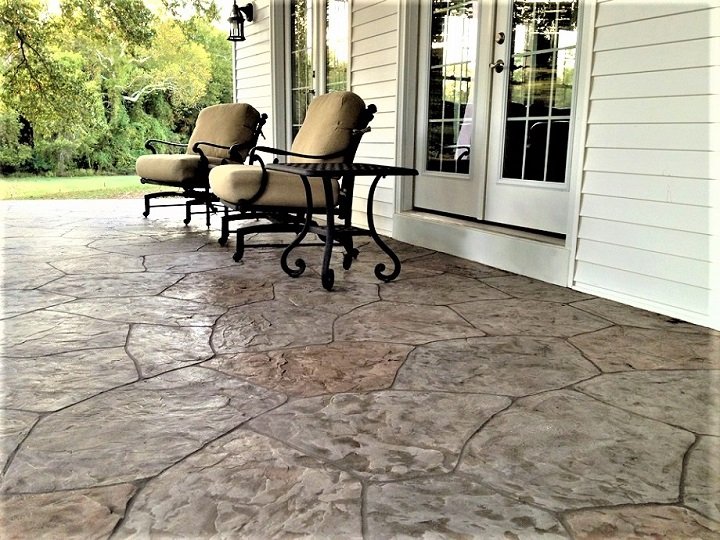
- Enhanced Aesthetics: Resurfacing offers a wide range of decorative options, allowing you to customize the look of your patio with various colors, textures, and patterns. You can achieve a modern, rustic, or contemporary aesthetic to complement your home’s style.
- Improved Durability: Modern resurfacing materials can enhance the durability and lifespan of your concrete patio, making it more resistant to cracking, staining, and weathering.
Assessing the Condition of Your Concrete Patio
Before you begin any resurfacing concrete patio project, it’s crucial to thoroughly assess the condition of the existing concrete. This will help you determine the extent of the damage and choose the most appropriate resurfacing method. Consider the following:
- Cracks: Are they hairline cracks or deep, wide cracks? Hairline cracks can often be easily covered with a resurfacing compound. Wider cracks may require patching or more extensive repair before resurfacing.
- Spalling: Is the surface of the concrete flaking or crumbling? Spalling indicates significant deterioration and may require more aggressive surface preparation.
- Discoloration: Are there stains, mildew, or other discoloration issues? Proper cleaning and surface preparation are essential to ensure the resurfacing material adheres properly and provides a uniform finish.
- Drainage: Is the patio properly sloped to allow for water runoff? Poor drainage can contribute to moisture damage and accelerate deterioration.
- Stability: Is the concrete slab stable and level? If the slab is severely uneven or unstable, resurfacing may not be a viable option, and replacement may be necessary.
Preparing the Concrete Surface for Resurfacing
Proper surface preparation is paramount to the success of any resurfacing concrete patio project. A clean, sound surface is essential for the resurfacing material to bond properly and provide a long-lasting finish. Here’s a step-by-step guide to preparing the concrete surface:
- Cleaning: Thoroughly clean the concrete surface using a pressure washer and a concrete cleaner or degreaser. Remove all dirt, debris, oil stains, and mildew.
- Repairing Cracks and Damage: Fill any cracks or damaged areas with a concrete patching compound. Follow the manufacturer’s instructions for application and curing. For larger cracks or spalled areas, you may need to use a concrete repair mortar.
- Etching or Grinding: Etch the concrete surface with muriatic acid or grind it with a concrete grinder to create a rough texture. This will improve the adhesion of the resurfacing material. Always wear appropriate safety gear, including gloves, eye protection, and a respirator, when working with muriatic acid or a concrete grinder.
- Rinsing: Thoroughly rinse the concrete surface with clean water to remove any residue from the etching or grinding process.
- Drying: Allow the concrete surface to dry completely before applying the resurfacing material.
Choosing the Right Resurfacing Material
Several types of resurfacing materials are available for resurfacing concrete patio, each with its own advantages and disadvantages. Here are some of the most common options:
- Concrete Overlay: A thin layer of modified concrete that is applied over the existing concrete surface. Concrete overlays can be applied in various thicknesses and can be textured or stamped to create decorative patterns. [See also: Stamped Concrete Patio Designs]
- Self-Leveling Overlay: A type of concrete overlay that is designed to flow smoothly and create a level surface. Self-leveling overlays are ideal for patios with uneven surfaces or drainage issues.
- Epoxy Coating: A durable and chemical-resistant coating that can be applied to concrete surfaces. Epoxy coatings are available in a wide range of colors and finishes and are often used in garages and workshops. However, they can also be used on patios for a modern, industrial look.
- Acrylic Coating: A more flexible and UV-resistant coating than epoxy. Acrylic coatings are a good choice for patios that are exposed to direct sunlight.
- Polyurethane Coating: Offers excellent abrasion resistance and flexibility. Polyurethane coatings are often used in high-traffic areas.
- Stamped Concrete Overlay: Allows you to mimic the look of brick, stone, or tile at a fraction of the cost. Stamped overlays involve applying a concrete overlay and then using stamps to create the desired pattern.
Consider factors like durability, aesthetics, cost, and ease of application when choosing the right resurfacing material for your resurfacing concrete patio project.
Applying the Resurfacing Material
The application process will vary depending on the type of resurfacing material you choose. Always follow the manufacturer’s instructions carefully. Here are some general tips for applying resurfacing materials:
- Mixing: Mix the resurfacing material according to the manufacturer’s instructions. Use a concrete mixer or a drill with a mixing paddle to ensure a consistent mixture.
- Application: Apply the resurfacing material evenly over the prepared concrete surface using a trowel, squeegee, or sprayer. Work in small sections to ensure proper coverage.
- Texturing (Optional): If you want to add texture to your patio, use a broom, roller, or other texturing tool to create the desired effect.
- Curing: Allow the resurfacing material to cure according to the manufacturer’s instructions. This may involve keeping the surface moist for several days.
- Sealing: Once the resurfacing material is fully cured, apply a concrete sealer to protect the surface from stains and weathering. [See also: Best Concrete Sealers for Patios]
Maintaining Your Resurfaced Concrete Patio
Proper maintenance is essential to prolong the life of your resurfacing concrete patio. Here are some tips for maintaining your resurfaced patio:
- Regular Cleaning: Clean your patio regularly with a mild soap and water solution. Avoid using harsh chemicals or abrasive cleaners, as they can damage the surface.
- Sealing: Reapply concrete sealer every one to two years to maintain the protective barrier.
- Promptly Remove Stains: Clean up spills and stains immediately to prevent them from penetrating the surface.
- Avoid Heavy Impact: Avoid dropping heavy objects on the patio, as this can cause cracks or chips.
- Protect from Freeze-Thaw Cycles: In cold climates, protect your patio from freeze-thaw cycles by applying a de-icing salt or sand.
DIY vs. Hiring a Professional
Resurfacing concrete patio can be a DIY project for experienced homeowners. However, if you’re not comfortable working with concrete or if your patio has significant damage, it’s best to hire a professional concrete contractor. A professional can ensure that the job is done correctly and that the resurfaced patio is durable and long-lasting.
Cost Considerations for Resurfacing Concrete Patio
The cost of resurfacing concrete patio will vary depending on the size of the patio, the type of resurfacing material used, and the complexity of the project. DIY projects are generally more affordable than hiring a professional. However, remember to factor in the cost of tools, materials, and your time. Getting quotes from multiple contractors is recommended if you decide to hire a professional to ensure you’re getting a fair price.
Conclusion: Enjoy Your Revitalized Outdoor Space
Resurfacing concrete patio is a worthwhile investment that can significantly enhance the beauty and functionality of your outdoor space. By following the steps outlined in this guide, you can transform your old, worn-out patio into a stunning and inviting area for relaxation, entertainment, and enjoyment. Whether you choose to tackle the project yourself or hire a professional, the results will be well worth the effort. So, take the plunge and give your concrete patio the makeover it deserves!
